

4 Summer Garden Pallet Project Ideas
14 Jul 2017
Summer is a great time to work on some garden projects, especially now when we all have a bit more free time. Some crafty upcycling means that you don’t have to spend a fortune while you do it. Simply get your hands on a pallet or two and use these versatile packing materials to re-imagine your outdoor space.
1.Garden Planters
Garden ideas can be as simple or as complex as you choose. For example, you can find used wooden pallets and recycle them as garden planters. Identify an area of your garden that you would like to use for a bed. Prepare the ground underneath as you wish. If it’s a lawned area and you want your new bed to sit above it, then dig out the grass and any weeds first. You could place a membrane over the top too. Use the wood from your reclaimed pallets to create a basic square or rectangular structure, nail the planks together and place the new planter in place before filling it with a gravel layer and compost. This planter will certainly be far more cost-effective than buying one from a garden centre, and you will be displaying your eco-friendly recycling credentials too.
If you feel more ambitious for summer pallet ideas, then you can use the same store of recycled wood to make elevated planters. Just remember not to overfill them, as they can become very heavy and difficult to move. Why not make square planters of different sizes for a backyard or decking area? They will create great visual interest for your plants and flowers. You can grow vegetables and fruit too as part of your five-a-day.

How To Do It:
Step 1: Scrub down the pallet if it’s dirty and sand any rough edges.
Use a bit of washing up liquid dissolved in water to scrub it down with a sturdy brush. Rinse it off with a hose. Once it dries enough that it doesn’t feel rough to the touch, use heavy sandpaper to smooth down any edges that are too splintery
Step 2: Decide how big you want your planter to be.
If you want a square box, you could use 20 in (51 cm) pieces, along with skinnier pieces for a frame. If you want a rectangle, you’ll need some longer pieces and some shorter pieces.
Step 3: Take the pallet apart until you have planks and wooden blocks.
Use the claw end of the hammer to wedge apart all the boards until you have completely taken the pallet apart. With some boards, you may need to use a splitting wedge and a mallet. Push the splitting wedge in between the boards and hit the end with the mallet.
Step 4: Build the base with 2 longer planks and several shorter planks.
Layout 2 long planks parallel to each other. Aim for lengths of that are about the same size as your longest side, such as 20 inches (51 cm), plus the width of the wood. Across the planks, layout smaller planks that are equal in length to your shortest side, such as 16 inches (41 cm). Place the smaller planks up against each other so they form a solid base for your planter. Leave a space on each edge of the long planks that’s about the width of the wood, as you’ll build up the sides of that area. Nail the smaller boards onto the longer boards.
Step 5: Begin building the walls up.
When putting your sidewalls in place, try to offset them at the corners. That is, when setting down 1 plank on its side, it should go all the way to the corner edge on one end but leave enough space on the other end for the next side to come all the way into that corner. Nail the pieces into the base, as you should have left enough space that the boards sink down a little and you can nail it in from the side at an angle.
Step 6: Put in corner posts to stabilize your work.
Place a small piece of wood in each corner of the box and nail them into the bottom with your nails at an angle. You may need to cut a board in half to get a smaller piece of wood.
Step 7: Continue building the walls up.
As you build up, continue to offset the boards but alternate which board goes to the corner on each layer. For instance, if a shorter side goes all the way to the corner on one layer, the longer side should go all the way to that corner on the next layer. As you make your walls, nail them into the corner posts and into each other at the sides, creating a stable structure.
Step 8: Sand & Paint.
Use sandpaper to smooth out any rough edges that are leftover. Then you can decorate your planter as you wish!
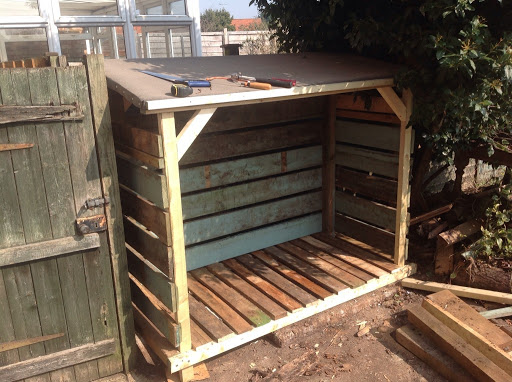
2. A Garden Shelter
If you started to feel quite ambitious, you could turn your recycled pallets into garden shelters. Use the planks to create a simple arch structure and perhaps make an accompanying bench too so that you have somewhere to retreat from the sun with a cold drink – or the rain during a more British summer afternoon.
How To Do It:
Step 1:Smooth any edges and remove any splintered parts.
Use sandpaper to smooth down any rough edges or pallets.
Step 2: Start with the base.
Start with building the base, make sure the pallets are all fixed together to prevent potential injury.
Step 3: Start Building vertically.
Now you have safely built your base, you can start to build the supportive walls. The simplest way of doing this is to rotate your pallets so that they sit at a right angle to the base. Secure these pallets to the base all the way around until you have three connected walls. If you wish to make your shelter taller, add pallets to the walls until you achieve your desired height.
Step 4: Create your roof.
Now that you have your base and your walls (to your preferred height. We can now start the process of adding the roofing part of your shelter. Now to prevent gaps in your roof, you will need to use spare planks to fill in the pallets. Once you have done this you can start building the roof, make sure when building the roof of your shelter that you allow an overhang of at least a few inches over each wall to allow for weather run-off.
Step 5: Stain & Decorate.
Painting or staining is the best way to both customise and protect your pallet furniture from the elements. Make sure that you cover all the wood even the bits that might usually be hidden from view.
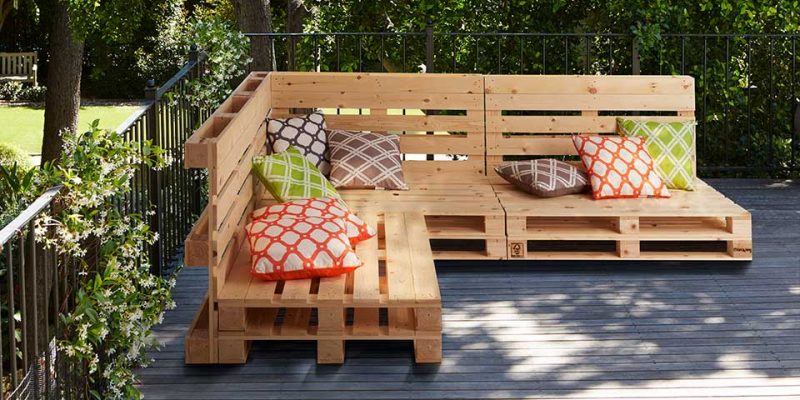
3.Table and Chairs
More advanced woodworkers could also use the recycled planks of wood to make garden tables and chairs. Protect them with garden varnish so that the elements don’t destroy the wood, and you can enjoy your own bespoke seating area for the seasons ahead. You’ll find plenty of ideas online. You could even make smaller versions for the kids so that everyone can enjoy al-fresco dining.
How To Do It:
Step 1: Sand and Wash your Pallet.
Use sandpaper to smooth out any rough edges or patches on the pallets. Use a bit of washing up liquid dissolved in water to scrub it down with a sturdy brush. Then, rinse it off with a hose. Check again to make sure edges are smooth and aren’t splintery.
Step 2: Create a base for your chair by using one or more pallets.
Depending on what height you would like the chair, keep adding pallets to the base to elevate the seating position.
Step 3: Add another pallet to create a backrest.
Fix another pallet to the base to provide suitable back support.
Step 4: Stack Pallets to create an accompanying table.
Based on the height of the chairs, stack multiple pallets together after following step number 1. Make sure the pallets are securely fixed together to avoid injury.

Step 5: Paint & Decorate.
Painting or staining is the best way to both customise and protect your pallet furniture from the elements. Make sure that you cover all the wood, even the bits that might usually be hidden from view.
4.Shelving
Many urban and smaller spaces benefit from having garden shelving that allows you to store and display items vertically. Use the wooden planks from reclaimed pallets to make simple shelves on a fence or a wall and display hanging or trailing plants, garden art or even small planters. Solar lights and anti-insect candles would also look very nice displayed in this way.

How To Do It:
Step 1: You guessed it! Sand and Wash your Pallet.
Use sandpaper to smooth out any rough edges or patches on the pallets. Use a bit of washing up liquid dissolved in water to scrub it down with a sturdy brush. Then, rinse it off with a hose. Check again to make sure edges are smooth and aren’t splintery.
Step 2: The Math
You have three choices. (1) You could use the pallet “as Is” which is 40″ X 48″. This would work well if you had access to both sides of the shelves. (2) Cut the pallets in half to create two shelves 20″ deep X 48″ wide. or (3) Cut them in half you have shelves 24″ deep X 40″ wide. Work out the sizes and dimensions that work best for you (cut the pallets to a size that is suitable for, this may differ from these sizes).
Step 3: Cut the pallet to size.
Unless you have a huge saw you are going to have to flip the pallet over and cut the other side using the first cut to measure by. It pays here to make sure your saw blade is perfectly square. Most likely you will have to remove some nails. We used a chisel and a catspaw to remove them but they are ring shank nails designed not to pull so expect a struggle.
Step 4: Start to assemble the shelves.
Depending on space it may be easier to build in place vertically. If you have plenty of room it may be more convenient to build the shelves on the floor horizontally and then tilt the shelves up. In either case, you will need a support post at each corner as well at each pallet convergence.
Step 5: Finish assembly.
Screw/Nail in the vertical support posts in order to strengthen the shelves. Then place the top pallets on top to sit on the cross braces. Make sure that these top pallets are fixed in place to make them as safe as possible.
Step 6: Paint, Decorate & Enjoy.
Paint or stain the shelves to preference, or decorate how you see fit. Most importantly enjoy and use your new shelves!
Start to Think Differently
If you can start to visualise a small space garden upwards, it will free up space on the ground for you to enjoy and relax in. Look for more pallet garden ideas in your local community, allotment, garden groups and garden centres to get that inspiration flowing. You’ll find the materials widely available and easy to work with. It’s a great way to recycle and get more use out of wooden materials that would otherwise go to waste.