
How to build a shed using pallets?
31 Mar 2014
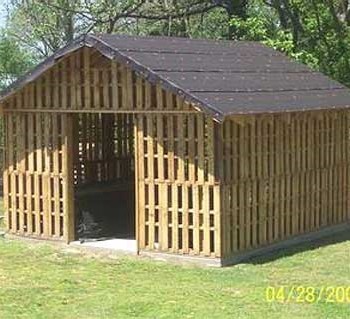
Buying a garden shed can be expensive, but there are a number of cheaper options. One potential way in which you can create a solid, durable shed is to build one yourself from wooden pallets. This has the advantage of being fairly easy to construct over a weekend, and it’s extremely cheap in comparison with prefabricated sheds. You may even be able to get the pallets for free. You’ll find that lots of local businesses, including timber yards, use them and may well appreciate you taking unwanted ones.
Everything starts with a base. The advice here is not to use wood for the base but something more durable such as paving slabs (preferably bedded down on a sand and cement mix) or better still, concrete.
As for cost, it depends, of course, on the size of your shed and whether the wood has been donated. But it’s a reasonable assumption to say you can build an 8-foot by 12-foot shed for less than £100.
Materials and Tools
Pallets come in various sizes, but the most common is 40 inches by 48 inches. The top and bottom deck boards are used for the outer finish of the shed and the supporting “stringers” (usually 2 inches by 4 inches) are used to create the shed framework. You will need to use a claw hammer and wooden mallet to de-construct the pallets into their component parts ready for use.
You will also need galvanised three inch woodscrews, galvanised nails, galvanised metal brackets, a hammer, and plywood or roofing board to create the roof, together with two or three galvanised hinges and a latch for the door.
Framework and Walls
To create the framework, simply cut and join 2 x 4 inch timbers together with three inch galvanised woodscrews and overlap them in order to create frames for all four walls and a separate frame for the door. Remember to create an opening for the door in the front wall framework; to slope the side walls; and to make the back wall lower than the front for a “pent” style sloping roof.
For each of the walls and the door, attach the deckboards to your framework using galvanised nails, starting at the bottom and securing each set so that it overlaps the previous set (i.e. secure each board at the top only). Once finished, stand and join all four walls to form the shed and mount the door. Secure to the base using galvanised metal brackets in the interior of the shed.
Roof
The roof can be created using sheet plywood. For greater durability (albeit slightly higher associated cost) consider using marine plywood or construction roofing board. Next, attach this to your walls using galvanised screws. Finally, cover the roof with either roofing felt or for greater durability, consider EPDM rubber roofing membrane which has a life span of 50 years or more.
Finishing Touches
Your shed is now complete. To waterproof it and protect it against pests, treat the wood with a good quality exterior wood preservative in the colour of your choice. If properly maintained, it will last for years, and you can bask in the knowledge that it cost very little to create.
Image ref: http://www.flickr.com/photos/8599848@N05/